Tips from the Dorking Bindery: Solander Boxes
Making Solander boxes (using book board rather than timber) with stepped edges on the shells.
by Jim Finger, VBG President
One of the first non book items I made was some storage boxes. I sort of worked them out myself and found all sorts of problems to get them to work well. I then received a copy of Boxes for Books by Library of Congress USA preservation Department, a loose leaf ring binder publication. I made a few boxes then and they have served me well for storage of all sorts of pamphlets and ephemera. Times gotten on and I find I have needed some more so I decided on a batch of 18. Why 18? Because it matched the amount of board available!. I have a large roll of green cloth I bought many years ago so. But my skills have increased since the earlier lots and my understanding of the processed listed in the Boxes for books. I have a couple of 30mm thick laminate benchtop for the size of the box, about 10mm bigger than A4 in length and width and use that as the base patterns. I also allow the case to be 5mm longer and wider than the standard so it looks like the squares on a book when its finished. That also makes it easier to open. Along the way some things prove to be useful to improve the finish. I am always in trouble on a big job like this because I can keep my hands clean when I glue up one section. When I repeat it 20 times, I seem to get a bit of glue on my fingertips, and next thing I know glue is working its way up my fingers, across my palms and all across the job. So I have to be really careful with glue amounts and cleanliness.
Also on this batch, I managed to get the repeated measurements of the boards right, making the right spacers (gauges) for a variety of measurements, getting it square and exact. Nothing improves cutting technique like 60 pieces this big and 30 pieces that big. I am not yet perfect but a lot better. Precision makes the boxes which stay shut without a tie to hold them.
Secondly, rubbing down the cloth is much better, with the aid of a board clamped on the table as a tongue hanging out about twice the depth of the shells and about 20mm narrower than the narrowest inside of the shells. Allows the edges of the shells to be rubbed down much better and helps avoid bubbles in the cloth.
Thirdly, the advice in the book on the grove size and the template for grooves in the cover is great , and making up the correct gauge is really worth the time. I covered mine in cloth as the glue didn't stick the same way as if it was just a few pieces of board to make the gauge. Keep the gauges clean.
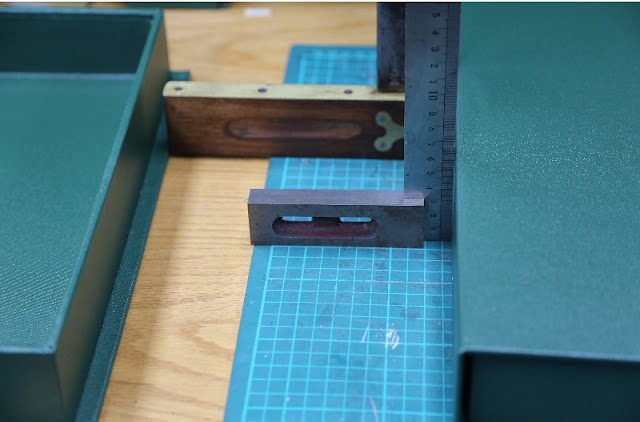
Fourthly, glue-ing up the shells to the cover needs to be precise. Having made the "squares" over the edges of the finished boxes rather than a straight square box, gives just a little extra scope for adjustment for the nice tight fit. But a part of the placement is making sure that the base shell is set in place so the cover will fold exactly to 90 degrees. Use a square to check this before the base is to be glued up. But a square falls over, try another. Maybe an engineers square.
But there is a block of aluminium ( if got it for nothing from the offcut bench at the aluminium supplier when I getting some other materials) and it sits well on the table and is easy to sight if the 90 is right. Glue the base shell up, place in the right place even head to tail. Check the cover folds 90 degrees. If its right the top shell will now fit and when suit the box is almost airtight. Now , press for 20 minutes minimum.
Fifthly, using weights is good for allowing the shell attachment to the cover. Lots of weights means fixing a lot at one batch at the same time. But the pressure isn't really enough to ensure the attachment is good. Remember even with the best corner cuts and the overlaps of the different points on the base and lid, there is still slight irregularities that make it hard to get a really close attachment. Nipping press for 20 minutes is what the book says and it means it. It makes the assembly of 18 bases then 18 tops take better part of 14 hours if you do it straight, so there is a desire to use weight if available, and making use of bricks etc. Much better to make it a backup job with other things happening. Put on in the press for an hour, then do the lid shell for another hour, etc. And be sewing text blocks or paring or gold work for the next hour time.
Also watch out for too much glue on the shell. It will leak out the edges when pressed. Remove with a damp cloth. Making a batch also improves the skills as you get to see just how much to glue up, and how too much( oozes out the edges) or too little (lack of adhesion) effects the end result. Remove any excess immediately with a damp cloth.


